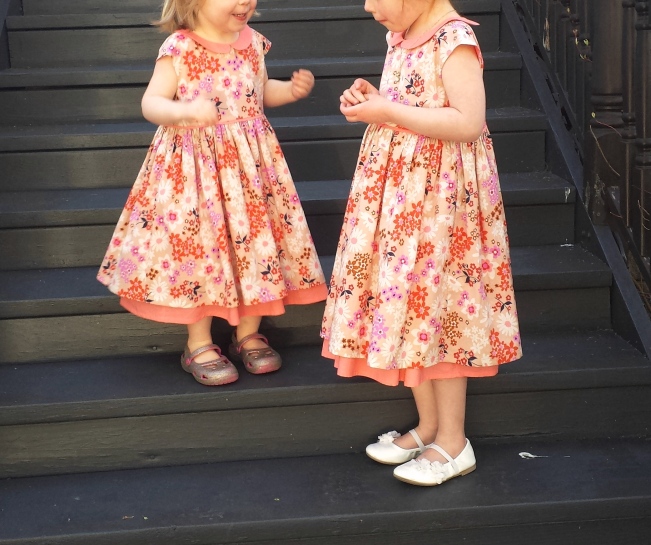
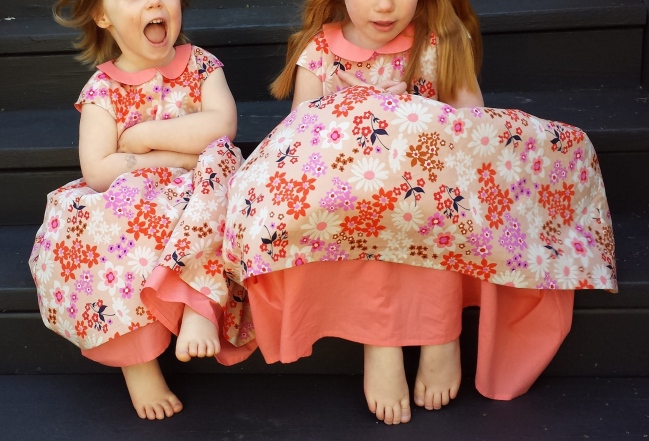
It’s birthday season at our house. Kiki and Lulu’s birthdays are two days apart — so the first week or so in May is pretty big around here. When I asked them what they’re thinking for birthday dresses this year, they both told me they wanted to match. Totally match. I was quite surprised, and here’s why . . .
I should start by saying that the reason I sew is, without a doubt, my amazing mom. She sewed all kinds of clothes for us (my sister and I) all through growing up — and we loved it. And, she sewed for herself, too. Really chic stuff. People were always talking about how talented and creative she is, and very rightly so. I wore her handmades even through college.
(That’s me on the left, circa 1978!)
So when I had my first baby, sewing seemed like the right thing to do.
But . . . there was one thing we didn’t love. We weren’t wild about the matching dresses she made and had us wear at the same time. This will not come as news to her — we were clear about this at the time. (Sorry, Mom). There was just something about it that was kind of embarrassing. It wasn’t a big tragedy or anything — just a minor bone of contention.
So, imagine my surprise when my own daughters insisted on matching dresses. I suggested using the same fabric but different dress patterns. No. Maybe the same dress in different fabric? No, no. “We want to match, Mom. Really match!”
What can I say? This one’s for you, Mimi.
These days, Lulu won’t wear anything the doesn’t have a skirt that “spreads around,” so I knew I needed to come up with something that has a really full skirt. After admiring the birthday dress creations of both Gail and Tara, I decided to jump on the Caroline Party Dress train. (And I’m so glad I did!)
Truth be told, I originally bought this very lovely and fun Cotton + Steel Vintage Floral lawn to make something for myself. But when I opened the package, both girls squealed and insisted that they must have it. How could I argue? So, I ordered a little more and got started.
I sewed up a size 5T for Kiki and 4T for Lulu, following the measurement guidelines in the pattern. As Gail did, I added extra length and width in the skirts, to assure fullness and dramatic twirlability. That worked out well.
(You can see the wind kicking up Kiki’s shirt here!)
The accent fabric is Cambridge Cotton Lawn in Mango by Robert Kaufman. Great stuff.

I decided to follow the trend of cutting the underskirt about and inch and a half longer than the outer skirt. I was very pleased with the whole thing until I finished the first dress and realized that the underskirt seam allowances were visible on the outside of the dress. Crap! How did I not think of that????
I couldn’t wrap my brain around how to insert the zipper and still have the back seam allowance end up on the inside. In a panic, I reached out to Rachel from Stitched Together, who made a longer underskirt like this for one of her daughters, and asked her how she did it. I learned that she cut the zipper off where the bodice meets the skirt and sewed the skirt as one solid piece, in the Hanami Dress style. She referenced this post as another example. I wondered if the dress would fit easily over the head with the shortened zipper — it definitely would have. I’ll have to try that next time. Thank you so much, Rachel — for the help and for sharing your gorgeous dresses!
Anyway, I ended up opening the back skirt seam from the zipper on down, flipping the seam allowances inside and re-stitching. On the outside of the dress, you definitely can’t tell that the seam is flipped under the zipper. I also flipped the side seams about 2 inches below the top of the skirt on down to the hem. It’ll be our little secret 🙂
These days, I’m crazy for matching the pattern on center back seams, zippers and button plackets. The method I’ve used in the past involved pressing the seam allowance on the pattern piece and the first cut piece, which seems pretty fiddly, to tell you the truth. After finding a nice shortcut for matching the pattern on the button placket of Kiki’s last O & S Hide & Seek Dress, I wondered if I could do the same for the zipper here. The answer would be yes!
Here’s what I did . . . First, I cut the right side of the bodice from the fabric. Then, I drew a line on the pattern piece 1″ from the center edge (to include the seam allowance for both right and left sides of the zipper, since the seam allowances are 1/2″).
Then I placed the cut right bodice piece on top of the fabric laid out for the left bodice piece, matching the print. I laid the pattern piece on top so that the raw edge of the cut right side piece matched up with the line I drew on the pattern piece.
(Since the cut piece gets lost in the pattern here, I drew in the white lines so that you can see it.)
Then, I just slid the right bodice piece out of the way and cut the left piece. That’s it!
Since the skirt doesn’t have pattern pieces (just rectangles cut to a certain measurement) all I had to do for back skirt pieces was cut one side, and then match the pattern, overlapping the center edges by 1″, and cut the other side.
Check out this matching! Who knew it was so easy??
Oh, and I also added flat piping at the waist. It’s just enough to break up the busyness of the print.
I’m happy to report that the girls are thrilled and cannot wait for their birthdays. I think this may also have something to do with the eagerly anticipated arrival of big girl bikes.
Thanks, Mom, for showing me how much fun sewing can be — even when your kids are less than cooperative!


How gorgeous! They are really beautiful dresses, and your pattern matching is absolutely perfect. So sweet that your girls want to match 🙂
Thank you so much!
Lovely, lovely dresses. Thanks for the quick tutorial on how to match patterns.
Thanks, Logan. Best wishes for your pattern matching!
Those dresses are so gorgeous!! So I have to tell you, I was equally baffled about the seam allowance showing on the underskirt. I ended up hemming my underskirt up with a wider hem to hide the seam allowance – now only about 1/2 an inch of the underskirt peeks out. It kinda worked. But Rachel’s solution is much better and I’m not surprised, she’s a pro! 🙂 Anyway, I love your dresses, and your pattern matching on the back is majorly impressive!!
Thank you so much, Gail. It gives me solace that the whole underskirt seam allowance was a puzzle for you, too! A wider hem is also a clever solution.
Thanks so much for all the inspiration that comes from your blog 🙂
Lovely, lovely dresses! Maybe I’ll give this pattern a try next year for my daughter’s birthday. But I’ll be forewarned for the seam allowances and the underskirt! Also thanks for the pattern matching tips. I really need to do a better job of this… or at least even attempt it!
Pingback: A Tale of Two Dolls « Rosemary Mornings
Pingback: My First Ileana Dress « Rosemary Mornings